
PHPUnit - Getting Started
PHPUnit
This is the getting started tutorial on PHPUnit.
What is PHPUnit?
PHPUnit is a unit testing framework and was created by Sebastian Bergmann and its development is hosted on GitHub.
Prerequisite
In order to learn PHPUnit it is assumed that you are familiar with PHP and Object Oriented Programming in PHP.
Things needed
Following are the list of things required to follow this tutorial.
- PHP development environment on your machine.
- Composer - which is a dependency manager for PHP
- Text editor to write the code. Example: SublimeText, Notepad++, TextMate, Coda etc
- You can also use IDE like Eclipse, NetBeans, PhpStorm or any other IDE for PHP
Optional
- DB like MySQL
- Web browser like Chrome, Firefox
Lets get started.
Create a project
Lets begin our journey by first creating a project folder in our localhost and name this as phpunit.
Now move inside this project folder and require phpunit using composer.
Composer is a PHP dependency manager.
Use the following command in terminal to get phpunit in your project.
$ composer require phpunit/phpunit
Output
YUSUF-MacBook-Pro:phpunit yusufshakeel$ composer require phpunit/phpunit
Using version ^5.7 for phpunit/phpunit
./composer.json has been created
Loading composer repositories with package information
Updating dependencies (including require-dev)
Package operations: 25 installs, 0 updates, 0 removals
  - Installing symfony/yaml (v3.2.7) Downloading: 100%
  - Installing sebastian/version (2.0.1) Loading from cache
  - Installing sebastian/resource-operations (1.0.0) Loading from cache
  - Installing sebastian/recursion-context (2.0.0) Loading from cache
  - Installing sebastian/object-enumerator (2.0.1) Loading from cache
  - Installing sebastian/global-state (1.1.1) Loading from cache
  - Installing sebastian/exporter (2.0.0) Loading from cache
  - Installing sebastian/environment (2.0.0) Loading from cache
  - Installing sebastian/diff (1.4.1) Loading from cache
  - Installing sebastian/comparator (1.2.4) Loading from cache
  - Installing doctrine/instantiator (1.0.5) Loading from cache
  - Installing phpunit/php-text-template (1.2.1) Loading from cache
  - Installing phpunit/phpunit-mock-objects (3.4.3) Loading from cache
  - Installing phpunit/php-timer (1.0.9) Loading from cache
  - Installing phpunit/php-file-iterator (1.4.2) Loading from cache
  - Installing sebastian/code-unit-reverse-lookup (1.0.1) Loading from cache
  - Installing phpunit/php-token-stream (1.4.11) Loading from cache
  - Installing phpunit/php-code-coverage (4.0.8) Downloading: 100%
  - Installing webmozart/assert (1.2.0) Loading from cache
  - Installing phpdocumentor/reflection-common (1.0) Loading from cache
  - Installing phpdocumentor/type-resolver (0.2.1) Loading from cache
  - Installing phpdocumentor/reflection-docblock (3.1.1) Loading from cache
  - Installing phpspec/prophecy (v1.7.0) Loading from cache
  - Installing myclabs/deep-copy (1.6.1) Downloading: 100%
  - Installing phpunit/phpunit (5.7.19) Downloading: 100%
symfony/yaml suggests installing symfony/console (For validating YAML files using the lint command)
sebastian/global-state suggests installing ext-uopz (*)
phpunit/phpunit suggests installing phpunit/php-invoker (~1.1)
Writing lock file
Generating autoload files
YUSUF-MacBook-Pro:phpunit yusufshakeel$
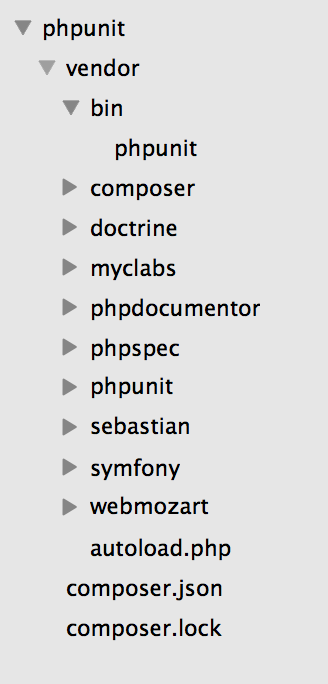
After installing composer our project folder will look like the following.
Running phpunit
Open terminal and run the following command to check if phpunit is running properly.
$ ./vendor/bin/phpunit
Output
YUSUF-MacBook-Pro:phpunit yusufshakeel$ ./vendor/bin/phpunit
PHPUnit 5.7.19 by Sebastian Bergmann and contributors.
There will be more lines printed in the terminal. I have skipped those lines. If you are able to get the above line which says the version and author of PHPUnit then it is installed.
Create a test folder
Now inside our project folder we will go ahead and create a test folder. This will hold all our test files.
So, run the following command in the terminal to create a test folder.
$ mkdir test
Create an app folder
Now inside the project folder we will create an app folder. Inside this folder we are going to keep all the application code.
$ mkdir app
Setting up the autoload for composer
Open the composer.json file and add the following lines.
{
    "require": {
        "phpunit/phpunit": "^5.7"
    },
    "autoload": {
      "psr-4": {
        "App\\": "app"
      }
    }
}
We have added the autoload part which means we want to load our code from the app directory.
And now we will run the dump-autoload command in the terminal to update the autoloader of composer.
$ composer dump-autoload -o
Output
YUSUF-MacBook-Pro:phpunit yusufshakeel$ composer dump-autoload -o
Generating optimized autoload files
YUSUF-MacBook-Pro:phpunit yusufshakeel$
Create phpunit.xml file
Now we will configure phpunit to run the test for us from given location. So, we will create a phpunit.xml file inside our project folder and write the following code in it.
<?xml version="1.0" encoding="UTF-8"?>
<phpunit
  bootstrap="vendor/autoload.php"
  stopOnFailure="true"
  colors="true"
  verbose="true">

  <testsuites>
    <testsuite name="My Test Suite">
      <directory>test</directory>
    </testsuite>
  </testsuites>

</phpunit>
So, we have defined some configurations for PHPUnit.
We are bootstrapping vender/autoload.php file. This will be loaded before our tests run. We want to stop PHPUnit execution on failure. We want PHPUnit to use colors to highlight output. And we want verbose output from PHPUnit.
We have also defined a test suite and named it My Test Suite and we want to run tests from the test directory.
Run phpunit test
And now if we run the phpunit test we will get the following output.

Lets write some tests in the next tutorial.
Have fun :-)
ADVERTISEMENT